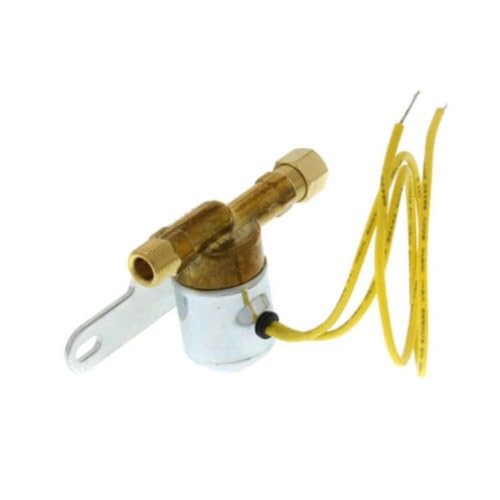
Your whole-house humidifier is the device strapped to your furnace that adds moisture to the air circulating through your home — the one that’s supposed to keep your sinuses, hardwood floors, and houseplants from drying out all winter. When it stops working, most people assume the whole unit is shot and start pricing replacements. Before you do that: check the solenoid valve. A solenoid valve is the electrically controlled water gate that opens when the humidistat calls for humidity and closes when it doesn’t. It’s roughly the size of a D-cell battery, it costs $15–$35 to replace, and it is the single most common failure point in bypass and flow-through humidifiers. This article will show you how to diagnose whether yours has failed, how to source the right replacement, and how to swap it yourself — plus the decision rules that tell you when a replacement actually is the smarter call.
Why the Solenoid Valve Fails First
Every time your humidistat calls for humidity, the solenoid valve opens to let water flow through. Every time the call ends, it slams shut. On a cold-climate installation running October through April, that’s potentially hundreds of open/close cycles per day. Over two to five seasons, the internal plunger and its rubber seat wear, the winding inside the coil fatigues, or mineral scale from hard water gums the mechanism until it sticks open (flooding your drain line) or sticks closed (no output at all).
Per ACHR News’s field-notes feature on common humidifier failures, solenoid valve failure accounts for a disproportionate share of “humidifier not producing moisture” service calls — and technicians consistently flag it as the diagnostic starting point before condemning the entire unit. The Aprilaire installation and maintenance manuals for the 400/500/600 series list solenoid failure explicitly in their troubleshooting trees, right after “check water supply pressure” and “verify 24VAC at humidistat terminals.”
Two failure modes matter here:
Stuck closed (most common): The valve won’t open. Water never reaches the distribution tray or pad. The humidistat calls, the furnace runs, and nothing happens. Relative humidity stays flat.
Stuck open: Water trickles constantly regardless of whether the humidistat is calling. You’ll see continuous drain line discharge or, worse, a wet pad that never fully dries and grows mold. This failure mode is less common but more urgent.
Both are usually the solenoid. Neither requires a new humidifier.
Diagnostic: Is It Actually the Solenoid?
Don’t buy a part you don’t need. Work through this sequence first.
Step 1 — Verify 24VAC is reaching the valve. With a multimeter set to AC voltage, probe the two terminals on the solenoid coil when the humidistat is actively calling (thermostat set high, humidity setpoint above current level, furnace fan running). You should read 24–28VAC. If you’re reading zero, the problem is upstream — check your humidistat wiring, the humidistat itself, and whether the humidifier’s door/panel interlock switch is engaged. Per the Honeywell HE360/HE365 installation guide, many “no output” calls are actually an open circuit at the humidistat or a panel switch that wasn’t fully closed after a filter change.
Step 2 — Listen at the valve. When 24VAC is confirmed present and the call is active, put your fingertip on the solenoid body. A working solenoid produces a faint audible click and a subtle vibration as the plunger pulls in. No click, no vibration = coil failure or stuck plunger.
Step 3 — Check for scale. If you have hard water (above roughly 7–10 grains per gallon, which covers most of the Midwest and Southwest), remove the solenoid and inspect the inlet screen and plunger seat for white or tan mineral crust. Scale buildup is the leading cause of premature failure in hard-water installations, per the Building Science Corporation’s guidance on moisture control — hard water accelerates every maintenance interval in humidification equipment.
Step 4 — Rule out the water panel/pad. A completely plugged evaporator pad can mimic solenoid failure by restricting flow to near zero. If the pad is original and more than one season old in a hard-water home, replace it alongside the solenoid. It costs $8–$15 and removes a variable.
By the Numbers
| Symptom | Most Likely Cause | Part Cost (2026) |
|---|---|---|
| No output, 24VAC confirmed at valve | Solenoid failure | $15–$35 |
| No output, 0VAC at valve | Humidistat or wiring | $25–$60 |
| Continuous drain, no call | Solenoid stuck open | $15–$35 |
| Low output, water present | Clogged pad or orifice | $8–$15 |
Sourcing the Right Replacement Valve
This is where people get burned. Solenoid valves are not universally interchangeable even within the same brand family. The key spec variables are:
Voltage: Almost all residential humidifier solenoids are 24VAC. Confirm before ordering.
Flow rate / orifice size: Aprilaire 400/500/600 series valves are rated for specific flow to match the unit’s GPD design target. Installing a higher-flow aftermarket valve on an Aprilaire 600 can overdrive the distribution tray and cause overflow. Installing a lower-flow valve on a unit sized for a large home starves output. Aprilaire’s installation manuals specify orifice size and list the correct OEM part number — use that number as your sourcing anchor.
Pipe connection size: Most residential units use 1/4-inch or 3/8-inch compression or push-fit fittings. Measure the tubing OD before ordering an aftermarket valve.
OEM vs. aftermarket: OEM Aprilaire solenoids (part numbers in the 4040 and 4041 series for their current lineup) run $25–$35 from authorized HVAC distributors. Generic 24VAC solenoids with matching specs run $10–$18. Owners in long-run forums consistently report that the generic valves work but tend to have shorter service lives in hard-water installations — the internal seat material is softer. For a unit under warranty, use OEM to avoid voiding coverage. For a five-year-old unit you’re nursing along, the generic makes financial sense.
Warranty note: Aprilaire’s authorized dealer policy — the same one that governs their Amazon Marketplace situation — extends to replacement parts. Parts purchased from unauthorized channels may not be covered under warranty claims. If your humidifier itself is still within its warranty window, verify the parts source before you buy.
For Honeywell/Resideo HE-series units, the replacement solenoid is typically the 32003796-001 or equivalent — the Honeywell Home parts catalog lists this clearly. Third-party cross-references exist, but confirm inlet thread size matches your specific model year; Honeywell revised the valve body design between the HE260 and HE360 generations.
GeneralAire and AprilAire 865 steam units use entirely different solenoid configurations — higher-pressure fill valves, not low-pressure trickle valves. The diagnosis and replacement logic is similar, but the parts are not interchangeable with bypass-unit valves. Steam unit solenoid replacement is a closer call between DIY and contractor work because it involves the fill/drain cycle logic of the steam cylinder; if you’re not comfortable tracing that circuit, budget a service call.
The Replacement Procedure
Tools needed: multimeter, flathead and Phillips screwdrivers, adjustable wrench or slip-joint pliers, a small bucket or towel, and a 1/4-inch or 3/8-inch compression fitting tool if your unit uses compression connections (most do).
1. Shut off the water supply. Every humidifier has a saddle valve or dedicated shutoff on the cold-water supply line. Close it fully.
2. Disconnect power. Turn off the furnace at the disconnect, or at minimum kill the humidistat and disconnect the 24VAC leads at the solenoid terminals. Do not work on live 24VAC wiring; it won’t kill you, but it will blow fuses in your transformer.
3. Relieve line pressure. Open the humidifier’s water panel access door and let any standing water drain into your bucket.
4. Photograph the wiring and tubing routing before you touch anything. This takes ten seconds and saves thirty minutes of confusion on reassembly.
5. Disconnect the inlet tubing. On compression fittings, hold the valve body with pliers and turn the compression nut counterclockwise. Have your bucket ready — there will be residual water.
6. Disconnect the outlet tubing going to the distribution tray or orifice.
7. Unplug the coil leads. They are typically spade terminals or a two-pin Molex connector.
8. Install the new valve in reverse order. Hand-tighten compression fittings, then snug a quarter-turn with pliers — do not overtighten, which can crack the plastic valve body.
9. Restore water and power. Watch the valve for 60 seconds with the humidistat calling. Confirm water flows to the distribution tray, confirm no dripping at the fittings, and confirm flow stops when you reduce the humidity setpoint below current room level.
Total elapsed time for a competent DIYer on a first attempt: 30–45 minutes. On a known unit the second time: 15 minutes.
When Replacement Is Actually the Right Call
The solenoid repair makes obvious financial sense when the unit is otherwise functional — pad sealing properly, distribution tray intact, bypass damper operating, housing not corroded. It starts making less sense in these scenarios:
The unit is a first-generation drum-style humidifier over 12 years old. Foam drum media degrades, the drum motor wears, and bypass humidifiers of this era are not heat-pump compatible — a significant issue as heat pumps now represent a fast-growing share of new and replacement HVAC installs. Building Science Corporation’s residential moisture guidance notes that bypass humidifiers require a temperature differential across the heat exchanger that heat pumps in moderate-output mode often can’t sustain. If you’re planning a heat pump upgrade within three years, the $20 repair buys time, not a long-term solution.
You’ve already replaced the solenoid once in the last two seasons. Recurring solenoid failure in a short window usually means the root cause is water quality — scale is destroying seats faster than normal. At that point, the real fix is either a whole-house water softener or an upgrade to a steam unit, which is inherently less sensitive to mineral content because scale can be managed through cylinder replacement.
The unit is undersized for your current home envelope. If you’ve added square footage, improved insulation (tightening the envelope), or moved to a larger home, a working bypass unit at 12–17 GPD may simply be insufficient. Per manufacturer GPD charts — Aprilaire publishes these in their sizing guides — a well-insulated 2,500 sq ft home in ASHRAE climate zone 5 needs roughly 12–18 GPD; a leaky older home of the same size might need only 8–10 GPD because infiltration air carries humidity out faster, paradoxically reducing the effective load. Know which situation you’re in before spending money on maintenance.
The Decision Rule
If your unit is under 10 years old, passes the 24VAC test, and the rest of the mechanism looks intact → replace the solenoid valve. You’re almost certainly done.
If the unit is a drum-style humidifier approaching end of life, you’re planning a heat pump conversion, or you’ve replaced this valve before within 24 months → fix it to get through the season, then budget for an upgrade. Don’t let a $20 repair delay a decision that saves you three winters of inadequate humidity control.
If the solenoid is fine but output is still low → you’re looking at a pad, orifice, or bypass damper issue. Different article, similar logic: start with the cheapest possible failure mode and work outward before condemning the unit.
The solenoid is $20 and thirty minutes. The new humidifier is $400–$1,200 installed. That math does most of the work for you.